Processing – If Statement and FOR loops

There are many ways to change what your program will do or follow. One of them will be the IF statements. Statement is an expression of an attitude or belief that is made by means of actions or appearance and it works also in programming. We can tell a program to do something for us IF something else is true. If its false then it will continue what it was doing till what we want is true so it can change to the action we wanted it to do. Here is an example.

We started with a window being red. As we keep the window open it adds +1 red value to it making the red color becoming brighter and brighter. This program wouldn’t have an end to it with the red increasing with time. We didnt want that to happen. We wanted the red to stop at 255 and then go back to 0 and start increasing again from the start. Thats why we added the IF statement to make it work how we wanted to.

by adding this code ”if (statement) update” we changed the program to what we wanted to. If the value of the red color is larger than 255 then set the value of the red color back to 0. Written like this ”if(Redval > 255) Redval = 0;”


There are a lot of different IF values we can use in the program and this is how we use them:

“>” if something is greater than our limit

“>=” if something is greater OR equal than our limit

“<” if something is less than our limit

“<=” if something is less OR equal than our limit

“==” if something is equal to our limit

“!=” if something in not equal to our limit

“!a” if something is the opposite of our “a” statement

“a && b” if both “a” and “b” statements are true

“a || b” if either of “a” or “b” are true


And these are most if not all of the ways we can use the IF statements.


Now as for the FOR loops, they are an easier way to write a WHILE loop and to not have bits of codes all over the place.

while and for loops difference

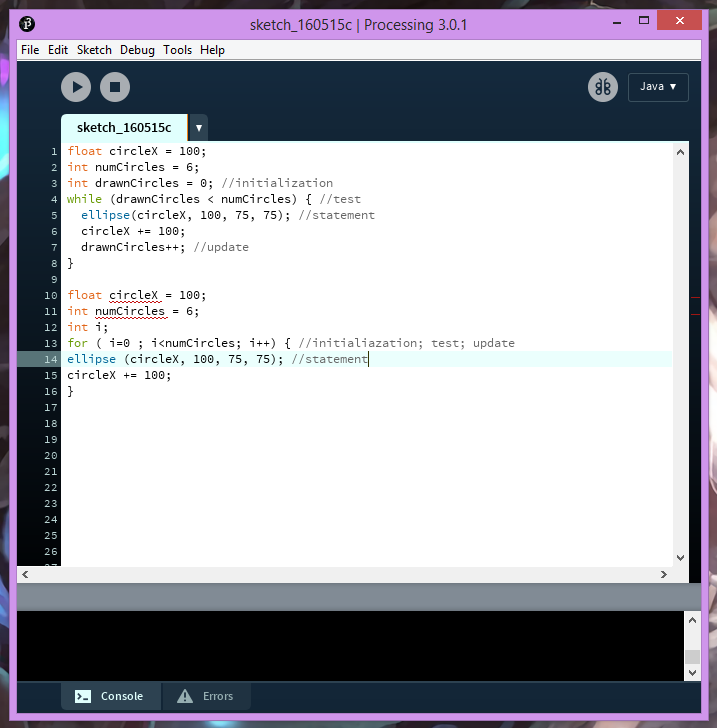
On top of the code you can see an example of a WHILE loop and it is written in this format:

Initialization

while(test)

Statement

Update


On the bottom of the code you can see an example of a FOR loop and it is written in this format:

for(initialization; test; update)

Statement


Writing a loop in a FOR format takes less place and you have all the coding in one lines instead of trying to write them in different lanes. It just makes things much for easier to make, write and keep in order.

Processing – Drawing a shape of our own

This time instead of using the default shapes of the program we learned how we can make a shape of our own by using the vertexes as a start and end point.

drzwShape

We start by writing down the code ”beginShape()” to tell the program where we will start writing down the coordinates. Then by using the code ”vertex(x, y)” we tell the program the x and y coordinates of each vertex and how to place them in our window. We can add as make coordinates as we need to and as many points we want. To end our shape we need to type in ”endShape(CLOSE)” to notify the program where to close the shape we were making when we were done. And thats pretty much it. If you dont like or dont want a certain shape in your program you can use this code to make one of your own.

Processing – Triangles, Angles and Quads

Adding to our previous range of shapes that we learned, we now know the code and how to make Triangles, Angles and Quads.

tringles

Starting off with triangles and following the same path as the over shapes we made we use this simple code: ”triangle( x1, y1, x2, y2, x3, y3)” with the x1 and y1 being the coordinates of the first point of the triangle on the scale of our window, x2 and y2 the coordinates of the second point and x3 and y3 being the coordinates of the third and last point. Pretty easy and pretty simple.

quad

Following the same order we can make a quad by typing in the code ”quad(x1, y1, x2, y2, x3, y3, x4, y4)” and just adding a 4th point to it.

The way to make an angle tho is different:

angles

To make an arc or angle we use this code: ”arc(x, y, width, height, start, stop)

with x and y being the coordinates of the arcs ellipse

the width and height being those of our default ellipse

and the two last units are were we want our arc or angle to start and stop


These were some more shapes we learned in coding to add up to the previous ones

Processing – Variables

This time we learned how to use Variables in our codes, to make things less complicated and to not have things all over the place.


What are variables you ask?

Variable is a data item that may take on more than one value during the run time of a program. We use variables in coding so we dont have to write a code that is repeated in more than one place over and over again. Take these screenshots as an example.

On the left screenshot we have our program written in detail. As you can see we used the same color more than one time. We had to write the whole thing more than one time. So this is were variables come in. By making a color variable such as one for the yellow color, we didnt have to fill each rectangle with the whole code of yellow but we just had to write ”yellow” which is how we named our variable in the different locations needed. Not having to bother with writing the whole code over and over again.


Another example is using variables in making a total new different one. Such as mixing colors and thats what we did in the next step.

color variables using them

We took two colors such as green and brown which we named ”lawnColor” and ”rustColor”, took each ones RGB and mixed them together to make a third new color out of them ”addClr”

As you can see Variables are very helpful when you dont want a messy code being all over the place and when you have done something wrong to look for it but it keeps your code tidy and neat.


There are also two different kind of variables you can use: ”Local” and ”Global” their difference is pretty easy.

Local we call those variables who are only true or only work inside a certain part of our code.

Global are the variables that can be used and are true on the whole skeleton of our code.

Here’s an example:

On the left side we have three variables, ”redVal”, ”grnVal” and ”bluVal” which are used in the ”void draw” part of our code, meaning they are local variables. If we tried to use these variables outside of the ”void draw” part of our code an error would pop up and say that the code cant find any of these variables.

On the right we took one of the variables and placed it outside of a specific part which in this case is ”void draw” and now we made it a global variable. If we were to use this variable now in a different part of our code it will work. Because the system defines it as a global variable which can be used in any part of the code.


Variables are really simple to use and really helpful too!


Processing – Starting Commands, Shapes and Colors

So this time we started learning how to input commands on how to make a small window. Shapes were also added to learn how the space inside the created window works and how they can be placed.

shapes colour

As you can see we have 3 tasks:

1.to create a window

2.to set a background color

3.to draw some simple graphics


Starting up we type in ”size()” to indicate how big our window that we will work in wants to be. Inside the brackets we will input the width and height of the window with this order (w, h). Also after every command in the setup you place a semicolon ; to show were each command ends.

After that we set a background color using the RGB setup as follows (red, green, blue).

Lastly we made some simple rectangles in it to see how they can be placed in our windows space. To make a rectangle you need to input the command ”rect” followed by the x and y coordinates and its width and height with the following order (x, y, w, h)

And thats pretty much it for a start on how to make windows and shapes.

After that we started learning how to fill the shapes with color and how to make ellipses too.


In these two examples we changed the color of the shape and we added a stroke around it which is a different color too.

To fill and use a stroke around of the shape you need to input those two commands before the command of the shape:

”fill()” to fill in the shape with color following the RGB setup fill(r, g, b);

”stroke()” to make a line around your shape again following the RGB setup stroke(r, g, b);


In the first example i made one with just simple gray tones and in the second one i experimented with color for a change.


Next we will make an ellipse


To make an ellipse as a start you need to input the command ”ellipse()” and then the x and y coordinates and of course the width and the height of the ellipse.

As you can see above, you can actually customize the stroke by either making it thicker/thinner or by not putting a stroke at all with these two commands:

”strokeWeight();” you can manipulate how thick or thin your stroke wants to be by putting a number in the brackets

”noStroke();” deletes the stroke from around your shape making it without any borders.


We can even change the thickness of a line with the same exact command as seen below


We start by making a line with the ”line()” command and putting in the x and y coordinates and of the left point of the line and then the x and y coordinates of the right part of the line. To change the lines thickness we can input the ”strokeWeight()” command before the command of the line!

As a last exercise, here is a small picture of lots of shapes put in together using all of the commands above!

shape picture

Using fill, strokes and both ellipses and rectangles we created a small drawing to test what we learned so far!


Processing – Starting up with the skeleton

New semester new modules! This time we have Processing as one of them. And ill be writing about some things we will learn during this module!


Skeleton

This is the skeleton where our program will work.

Starting with ”void setup ()” all small, is the place where you’ll code anything you want and see if it works

The curly brackets {} after void setup and at the end are necessary to indicate the place where you will place the commands for the program to process.

Thats pretty much it for a start, later on we will start putting in commands and see what the result might be.